
I have already shown you in one of my previous tutorials how to customize the Blogger lightbox by changing the background color, borders or text color, but this tutorial will show you how to replace it entirely with a really cool jQuery Lightbox plugin that is very popular among bloggers.
Showing posts with label Blogger. Show all posts
Showing posts with label Blogger. Show all posts
Saturday, April 17, 2021
Friday, April 16, 2021
Customize the Blogger Date Header of a Blogspot Blog
in: Blogger Blogging TricksDate header-style into blogspot blogs
This can be a really cool addition to your blog and something that can be customized to suit your layout and design. What we are going to do in this tutorial is changing the Blogger date header background color with some simple CSS adjustments that will make the date header to float on the left side of your post and to be partially out of the structure like a banner with a colorful appearance.

Sunday, May 14, 2017
How to Stop Tracking your Own Visits from Google Analytics
in: Blogger Blogging Tricks Google Analytics
Google Analytics is basically used to track down the details of external users who are visiting and interacting with your website. However, reporting contains data from both external users and your own visits to your website. This is the reason why it might become difficult to identify how many users are actually visiting, interacting, using your website. Today in this article, we will learn how to stop tracking your own visits from Google Analytics.
Take an Example; Let us assume you have an online shopping website having good traffic. However, high percentages of internal visitors (your own visits) are visiting the website to test different elements. This will increase the the overall number of hits to your website. Your report will display large number of visitors but it would be difficult to distinguish how many visits came from customers and how many were your own visits.
How to Create an IP Address Filter in Google Analytics?
To stop tracking your own visits you need to exclude your IP Address from Google Analytics so it does not tracks any hit that comes from a particular IP Address.
- Go to Whatismyipaddress.com and look up for your your IP Address. If you already know the IP Address which you want to filter, then skip this step.
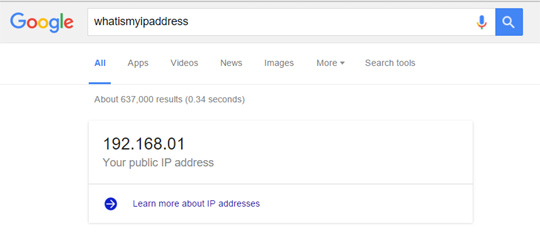
- Login to your Google Analytics account and select the “Admin” link from the top menu.
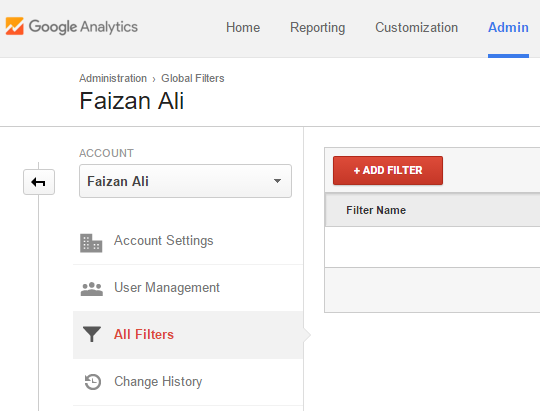
- From the drop down, Select a property on which you will like to add a filter. Now, Go to All Filters >> +Add Filter.
- Now give your filter a name, so it is easier for you to remember. In filter type, select "Predefined". In filter type, select “Exclude”. In source file or destination, select “Traffic from IP Address”. In Select expression field, choose “That equals to”.
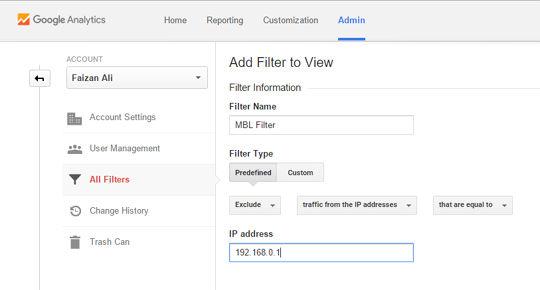
- In the IP Address field, enter the IP address that you would like to filter (See step 1 to find your IP Address).
- Once you are done with customizing your filter, press “Save” button.
You can add as much IP Address in the filter as you like. We hope this tutorial has helped you in learning how to stop tracking your own visits from Google Analytics. If you like this article, share it with your friends on Facebook, Google+, or Twitter.
Saturday, May 13, 2017
Add Google Calendar in Blogger
in: Blogger Blogging Tricks
Are you thinking about adding a nice Calendar to your Blogger site? Google Calendar is the right choice, as it keeps track of your events, scheduling events, and organizing everything very intelligently. Adding a Google Calendar to your site makes it easier for you to display important events or upcoming giveaways for your visitors. In this article, we will show you How to add a Google Calendar in Blogger.
What is Google Calendar?
Google Calendars is a web application that provides you amazing time-management facility. It keeps track of important events such as a birthday, upcoming events, your best friend's wedding and etc. So, you can never be late on any important events.Similarly, time management is also important for a blogger, having a rough schedule makes it even tougher. With Google Calendar, you can keep track of events, things to do, goals to achieve and any daily activity that you don’t want to miss.
How to add Google Calendar to your Blogger site:
Step#1: Getting Started with Google Calendar:Firstly you need to go to Google Calendar and login with your Google account. If you don't have an account, create a new one. After logging in, your Google calendar account is ready to assist you in remembering any important events.
Step#2: Creating New events in Google Calendar:
To create new events on Google Calender, click on the “Create” button located at the top left corner of your screen. You can see the below screenshot for assistance.


Step#3: Embed Google Calendar in Blogger:
Go to Google Calendar, click the gear button located at the top right side of your screen and select “Settings”.


We hope this tutorial has helped you in learning how to add a Google Calander in blogger. If you are already using this, please leave a comment below and let us know what are your experience with Google Calendar. If you like this tutorial, share it with your friends onfacebook, Google+ or Twitter.
Display Last Modified Date of Your Posts in Blogger
in: Blogger Blogging Tricks Recent Post Display
Blogger is being used by many people for different reasons. Some use it for blogs, whereas others use it for business purpose. When you publish a new post or story, often times you might need to make updates in the future. In this article, we will show you how you can display last modified or updated date to let your users know when your post was last updated. We will highlight how to display last modified date of your post in Blogger.

Enable Free HTTPS SSL Certificate in Blogger
in: Blogger Blogging Tricks
Are you looking to add some extra security measures to your blogger site? Are you worried about your blogger blog getting attacked from malware? With Blogger's Free SSL certificate service, now you can protect your blogger site and your visitors by adding an extra layer of security. Moving from HTTP to HTTPS and installing an SSL certificate to your blogger site is fairly simple. In this article, we will show you how to enable free HTTPS SSL certificate in Blogger.
Mixed Content Errors in BlogSpot Blogger
in: Blogger Blogging Tricks
In the past, we have shown you how to enable HTTPS SSL certificate in Blogger that makes it possible for you to have encrypted connections to your blogs. Since, blogger officially rolled out this feature for blogspot.com domains many people have enabled HTTPS for their blogs. However, they are facing multiple functionalities issues and the most common problem they are facing is of mixed content errors occasionally from their template, gadgets, or blog post content. Today, in this article, we will show you How to Fix mixed content errors in BlogSpot Blogger
Embedding a PDF or other Documents into a Blogger Blog
in: Blogger Blogging Tricks
There are many ways through which we can embed PDFs or other documents like Microsoft Word, Spreadsheets, PowerPoint Slides, and Excel Spreadsheets into our Blogger Blog. However, Google Docs is probably the most authentic and reliable way of embedding the PDF documents in a website. Therefore, today in this article, we will show you How to Embed PDFs or any other documents in Blogger Blog Posts.
First, go to https://drive.google.com and Sign in into your Gmail or Google account so that you have the admin privilege to the documents that would upload from your system hard drive.
After signing in to your Google account, the next thing is to upload a PDF file from your system hard drive. On pressing the upload icon from the left side panel a drop down menu will pop out which would consist of two options i.e. File and Folder. Just select “File” and head to the next step.

Now it will inquire you to select the PDF (document) that you want to embed on your website. Now press the open button and move to the next step.

On pressing the open button a small upload wizard would appear on the right side of your screen. It usually takes a minute or two to upload, but it entirely depends upon the size of your file and the speed of your internet connection.

Once uploading is finished, click on the file name and it will take you to a new page. Before, you can embed the document you have to change the permission of the file to the public. Thus, select the share button displaying at the top right corner of your screen and change the permission of the file from private to open.


Press change, and select “public on the web” so anyone on the Internet can find and access. No sign-in required. Finally, press the Save button to conclude the wizard. For detailed instructions, check out the following screenshot.

After changing the permission settings, now it’s time to grab the embed code. From the quick access tool bar select File >> Embed this PDF file. Now a new window will appear which would provide you the Embed code, copy the whole code and proceed to the next step.


After copying the code go to Blogger.com >> Create a new Post >> Select HTML Tab, and paste the code where you would like to see the document to appear. Now within the code that you pasted few moments a go search for /preview and replace it with /edit?usp=sharing. Now publish your article, and that’s it. See the following screenshot.

Be default the width of the document is set to 640 pixels while the height is set to 480 pixels. You can reduce the width and height according to your needs. You should now see a PDF attached to your blog posts along with some significant options like download and etc.
Thursday, April 6, 2017
How to Setup Custom Domain on Blogger with BlueHost
in: Blogger Blogging Tricks Custom Domain- Log in to your account at BlueHost.
- At the control panel, click on the DNS Zone Editor which can be found under the Domains section.

- Select the appropriate domain to which you want to add A records and CNAME records.

- Now add appropriate A Records in the fields provided, as shown below. You need to add the following 4 IP addresses for the A Records to configure your Blogger Domain one-by-one :
216.239.32.21
216.239.34.21
216.239.36.21
216.239.38.21

216.239.34.21
216.239.36.21
216.239.38.21
- To add the CNAME records, select CNAME from the drop down menu and enter the details of your domain. In the Name field, add the name of your domain with
www. In the CNAME field, writeghs.google.comfor linking your domain with Blogger. Add an appropriate Time-To-Live in the TTL field.
- Click on Add Record to save the new configuration.
Note that it may take some time for the new A records and CNAME records to take effect. Once the changes have taken effect, you can proceed with setting up your blog on Blogger.
Link : Signup with BlueHost
Monday, April 3, 2017
How To Embed PDF and other Documents In Blogger Blog Posts
in: Blogger Blogging Tricks
First, go to https://drive.google.com and Sign in into your Gmail or Google account so that you have the admin privilege to the documents that would upload from your system hard drive.
After signing in to your Google account, the next thing is to upload a PDF file from your system hard drive. On pressing the upload icon from the left side panel a drop down menu will pop out which would consist of two options i.e. File and Folder. Just select “File” and head to the next step.
Now it will inquire you to select the PDF (document) that you want to embed on your website. Now press the open button and move to the next step.
On pressing the open button a small upload wizard would appear on the right side of your screen. It usually takes a minute or two to upload, but it entirely depends upon the size of your file and the speed of your internet connection.
Once uploading is finished, click on the file name and it will take you to a new page. Before, you can embed the document you have to change the permission of the file to the public. Thus, select the share button displaying at the top right corner of your screen and change the permission of the file from private to open.
Press change, and select “public on the web” so anyone on the Internet can find and access. No sign-in required. Finally, press the Save button to conclude the wizard. For detailed instructions, check out the following screenshot.
After changing the permission settings, now it’s time to grab the embed code. From the quick access tool bar select File >> Embed this PDF file. Now a new window will appear which would provide you the Embed code, copy the whole code and proceed to the next step.
After copying the code go to Blogger.com >> Create a new Post >> Select HTML Tab, and paste the code where you would like to see the document to appear. Now within the code that you pasted few moments a go search for /preview and replace it with /edit?usp=sharing. Now publish your article, and that’s it. See the following screenshot.
Be default the width of the document is set to 640 pixels while the height is set to 480 pixels. You can reduce the width and height according to your needs. You should now see a PDF attached to your blog posts along with some significant options like download and etc.
Wednesday, February 8, 2017
How To Hiding "Subscribe to Post (Atom)" at the bottom of your blog
in: Blogger Blogging Tricks RSS SubscriptionWhere does "Subscribe to: Posts (Atom)" come from?
This is useful for readers who understand what it means: it lets them subscribe to an RSS feed of your blog - and even if you don't personally use it, RSS is important for bloggers. However:
- Some readers won't understand what it means,
- If you're showing a "blog-site" (ie a website created with blogging tools, rather than a classic blog), the command doesn't make sense, even though the idea of RSS subscription does
- It looks ugly, and
- RSS-savvy readers who aren't Blogger users generally look for the little orange square with radar bars, rather than an obscure, Blogger-specific, description of the link.

So you may want to remove it from your blog and replace it with a nicer-looking RSS-subscription button.
How to remove "Subscribe to: Posts (Atom)" from your blog:
1 Edit your template
2 Find this code in your template:
<!-- feed links-->
<b:include name='feedLinks'/>
3 Replace it with this code:
<!-- feed links
<b:include name='feedLinks'/> -->
What you have done is to comment-out the code: the "-->" is the "end of comment" command in HTML.
This approach is better than "hiding" the link by making it the same colour as your background (which could be seen as trying to hide things from the search-engines). It won't have any negative effect on your blog's performance, and you can undo it very easily by moving the end-of-comment text back again.
How to Edit Your Blogger Template
in: Blogger Blogging Tricks Templates
In general, the process to follow is:
- Open the template-editor
- Make a back-up copy of the template, as it is now
- Make the change
- Check that it works, and if not, go back to the previous template.
Of course it's not quite that simple - there are different procedures for working with dynamic vs designer or layout templates.
How to open Blogger's template editor, for dynamic template blogs
If your blog has a dynamic template, then use the see-all-posts icon for the blog to get into it the blog-options screen for the blog that you want to edit.When you are in the see-all-posts mode, the the address bar in your browser is like this:
http://www.blogger.com/blogger.g?blogID=5381944372768369653#allposts/postNum=0
Copy your blogID number - that is, the digits between blogID= and #allposts (it's bold in the example above)
Go go
http://www.blogger.com/html?blogID=NNNNNNNNNNNNNNNNNNNwhere you have replacd NNN... with your blogID
Note: the last time I tried this, it automatically opened in the old interface's template editor. As always, make sure you take a backup copy of the template - see instructions below before changing this.
How to open Blogger's template editor, for non-dynamic templates
- Go to the Design tab
- Click Edit HTML
- Note: this step has now been removed - however I've left it here for now, because I suspect that it may come back in future:
Click Proceed
Once you have your template open in the template editor, the next challenge is making changes successfully - and being in a position to recover if your changes were not successful.
How to edit your template
Make a backup copy of your current template

But if you would be upset to lose any template changes you made earlier, or if the change you are making now is not minor, then I strongly recommend making a copy before you start, just in case. To do this
- Click the Backup / Restore button near the top right of the dashboard (as shown below)
- Click the Download Full Template button, and then wait while the file downloads.
- After the download has finished, find the place where your computer puts downloaded files.
- Find the file that was just created,
- Rename it to something sensible
(eg MyBlog template backup before change 31 Jan 2012.xml) - Move the file to somewhere safe: usually somewhere on your computer is fine - or you make like to upload it to somewhere like Google Docs, to be absolutely certain that it won't get lost.

Make the change to your template
- Check whether the change you are making needs the Expand Widgets checkbox off or on, and put it to the right state.
(If the article telling you want to change doesn't mention it, then assume it should be off.)
- Find the code you need to change:
See this article from Southern Speakers if you're not sure how to use the find-feature that Blogger have now built into the template editor.
Note: many of the "how to" articles say to make sure that the Expand Widgets checkbox off or on. This checkbox has now been removed from Blogger's template editor. If the instructions you are following says to leave it "off", then you should just be able to follow it as is. However if you are told to turn it on, then you need to find the correct part of the code by searching for the widget-id or section name, and then "unfold" that to see the complete code.
- Make the change (this article doesn't go into the principles of template design, there are plenty of other articles and websites about that: I'm assuming that you know what you need to do).
- Click the Preview button:
If Blogger can make sense of the change you made, then a new window or tab opens, showing a view that looks like your blog's homepage. It's not a real copy of your blog (the links won't work, the spacing might not be quite the same, and it will have the word "Preview" diagonally in the top left corner).

Do a quick check that the screen looks right - for some changes you even be able to tell if the change has been successful just from this preview screen.
However: If the new window/tab shows an error message like
Your template could not be parsed as it is not well-formed. Please make sure that all XML elements are closed properly. <br/> XML error message: The element type "div" must be terminated by the matching end-tag "</div>".Error 500or
Your template could not be parsed as it is not well-formed. Please make sure that all XML elements are closed properly. <br/> XML error message: Element type "b:widget" must be followed by either attribute specifications, ">" or "/>".then Blogger has not been able to understand the change you made. Sometimes the error message gives a clue about what's wrong, although it can be misleading. Check that you made the change correctly - fix any errors and click Preview again. If it still doesn't work, ask for help from the place that suggested the change you are making.
Once you are happy that the preview screen looks OK, click the Save or Save templatebutton.
How to test your template change

But if your change isn't visible on the front screen, you must check it after you have applied it. What to verify depends on your template type, what the change was, and what other features (eg the page-gadget as a menu, the archive widget, ) your blog uses. You need to decide what to test, based on all of these.
At least, I alwways click on and check on these things when I've made a major template change:
- the home page
- the items in the menu bar
- a label value
- an archive widget entry
- custom-search-engine results
- comments
And if I'm being particularly reader-focussed, I'll also check these things in more than one browser: usually in the current version of Internet Explorer, Firefox and Chrome.
Fixing Problems
If you find that the template change has caused problems, then ou have have a choice to make:Can you and your readers live with the problems on your blog for "a while", while you look for other solutions?
Or
Do you need to remove the change right now, so visitors can use your blog as it was while you solve the issues.
There is no right answer to this question: It's a personal decision, based on the blog, and your readers.
But if you do need to remove the template change, here's how to do it:
- Click the Backup / Restore button near the top right of the dashboard
- Click Choose File and find the file that you downloaded earlier
- Click Upload.
It is best to restore your template before you have changed any gadgets. If you get a message about widgets being missing, then it means that the gadgets associated with your blog are not the ones referred to in the template. If this happens, you need to decide whether to deep or delete any "orphaned" ones, and may need to check their settings again.