Showing posts with label Pages. Show all posts

Wednesday, April 21, 2021

Understanding the Page Elements of a Blogger Layout

 When following a tutorial to add a gadget/widget or make some customizations in a Blogger blog, some new users may not know the meaning of certain terms, and sometimes, it may be harder to locate them. As for the gadgets, usually it is required to access the blog's layout in order to add or arrange any of the page elements.


For a better understanding, here are some basic explanations about the Page Elements located in the Layout section of a Blogger dashboard.

What are the Page Elements?

Page Elements is, basically, the body of our blog. To access the Page Elements, we need to click on the "Layout" option in the Blogger dashboard.


Read More

Sunday, December 18, 2016

How to Add a Link in WordPress Posts and Pages

WordPress comes with a user friendly post editor called the Visual Editor.
You can see the visual editor by going to Posts » Add New or by editing an existing post or page.
To create a link, you need to click on the Link button in the visual editor.


When you click on the insert link button, it will bring up a popup window. In the URL field, you will enter the actual hyperlink, and in the link text field you will add the text that will be linked.
You also have the option to check the box next to ‘Open link in a new tab’ option. This will open the link in a new browser tab. It’s recommended that you use this option if you are linking to an external site.
WordPress also allows you to quickly link to posts and pages that you have published on your own website by using the content search feature.
Simply click on ‘Or link to existing content’ option and WordPress will show you recent content and a search field.
You can search for a post or scroll down to find it from the list. You need to click on the post title to select it and then click on Add or Update Link button.
Take a look at our 14 tips for mastering the WordPress visual editor to learn more.
Read More

Thursday, August 18, 2016

How To Add A Static Page To Blogger

You can add a static page to your blog with things like the week's homework or things that you want easy access to.

You can also make it a like to a website or extra links for learners.

It will stay in one place always be easily accessible.

To add a page go to your Settings and then layout- add a gadget.


Look for the page gadget and add it by clicking on the add sign.


Decide what you want of the page and where it goes.


Now go back to your overview page and select Pages to make a new page.


Here is how it might look.


Read More

Monday, August 15, 2016

Redirecting the Blogger Home Page to a Static Page

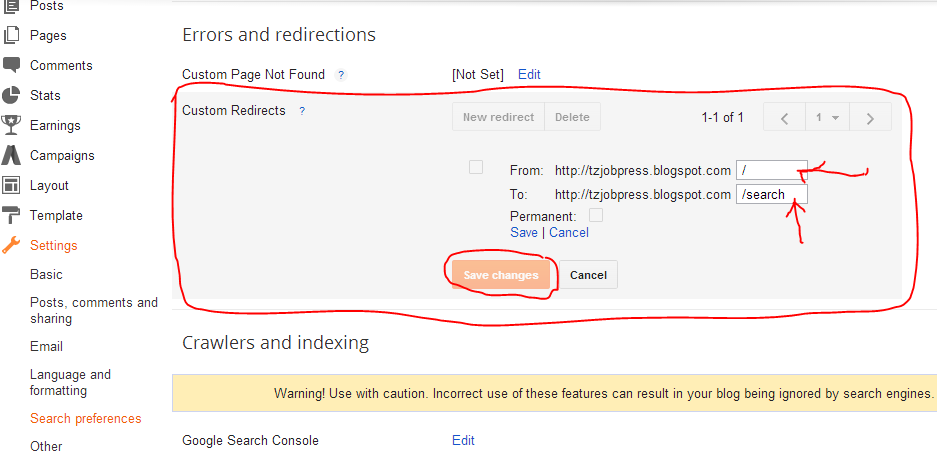
The great thing about the new Blogger template is that you can redirect pages to other pages now in the 'Settings' menu. Oddly, it is buried deep within the Blogger settings under 'Search Preferences':
Go ahead and choose the 'Edit' text link just to the right of the 'Custom Redirect' item. Now, this is a very critical step - be sure to enter the following text into the From: and To: boxes in the Redirect dialog:

In the From: box enter only a forward slash - "/". In the To: box enter the exact page name - in our case it was "/p/home-page.html". All Blogger static pages have a /p in front of the URL. You can see that the html name was the page title we used, so if you used something else for your title like 'Main Page' then the html would be /p/main-page.html.

Go ahead and press the little 'Save' text link and then the 'Save changes' button highlighted in the image above. What's now going to happen is that your main URL will redirect to the static page you've created. Go ahead and try to access your blog now - you should go directly to the new static page from the main URL.

The very last step is to hide the original Home page link and add a page link to your blog pages so that the visible tabs work correctly. First, enable tabs from the Pages menu:


Be sure to press 'Save arrangement' in the upper right of the screen (not seen here)!  When you go to your home page you should now see the tab bar across the top of your blog. However, now when you click on either Home or Home Page you're going directly to your new static page. What you have to do at this point is hide the original 'Home' Page using the Layout editor. Open the Layout using the editor from the Blogger main menu:

Choose the 'Edit' text link in the Pages item within the layout. This is going to allow you to hide particular pages. Once you open the Pages layout editor you'll notice that you can hide certain pages:


Be sure to un-select the check box right next to the 'Home' page to make sure it stays hidden. Press 'Save' to hide that particular tab.

The final step is to add another Page that links to the blog posts directly. This isn't something you have to do - your blog posts can still show on the right sidebar in the layout. However, if you do want to get back to the main blogging page that has the last posts together, you'll need to add a link back to them. Once we changed the Home page link to the static page there's no longer any links to the main Posts page.


Read More

How to Change Blogger Homepage

 I thought I will share with you on the process of redirecting your default Blogger page to a new page.

.1. Go to Settings > Search Preferences, and click on Edit under Custom redirects

2. In the From section, type /.

3. In the To section, paste the portion you have copied earlier.


Click Save followed by Save changes.

Editing the Custom Redirects in Settings > Search preferences of Blogger

Now, whenever you click on Home on your Blogger blog, the default page will not be the latest post but the new page that you have created.
Read More

Wednesday, July 13, 2016

Creating an Archive Page List in Blogger

You can solve this problem by creating an archive page on your blog. I’ll walk you through it step by step. *Remember, this isn’t for WordPress users, only BLOGGER.


1. Open up your blog and go to PAGES.
2. Click on NEW PAGE.
3. Title the page as ARCHIVE, INDEX, or GREAT READING. Basically use a title that makes it clear people will find the index.
4. On the right hand side, click on the button that says html.
5. Now you need to paste below code and preview the Page.
<script type="text/javascript" src="http://cloud.github.com/downloads/jhwilson/Create-a-Blogger-archive-page/Make-Blogger-Archive-Page.js">
</script>
<script src="http://abbyzawa.blogspot.com/feeds/posts/default?max-results=500&amp;alt=json-in-script&amp;callback=LoadTheArchive">
</script>
 I tested it in blogger and it worked well, see  http://abbyzawa.blogspot.com/p/i.html
NB: Remember to change the code in the second script call to match your blog URL!  (  http://abbyzawa.blogspot.com )
Read More

Sunday, July 3, 2016

How to Add Pages To Blogger

Adding pages (or a navigation bar or menu bar) is a great way to organize your blog to make important information easily accessible to your readers. Designer Blogs offers several types of navigation bars:  a navigation bar with simple text links, a navigation bar with custom buttons, and a navigation bar with drop-down menu (click on links for examples). These navigation bars are customized to give your blog a unique & professional look and can be purchased through our accessories shop.

However, you may just want the basic, non-customized Blogger navigation bar, so today we are sharing a tutorial that explains how to get pages and a basic navigation bar added to your Blogger blog all on your own!

BELOW ARE STEPS FOR ADDING PAGES TO BLOG:

Step 1: Log in to the Blogger blog you are wanting to add pages to and click on the “Pages” link.


Step 2: Click the “New Page” button.


Step 3: Type the page title (this will appear as a link on the navigation bar), add the page content and then click “Publish.” Note: make sure the page is published or it will not show on your navigation bar.


Step 4: After your pages are published, you need to add the Pages gadget to your layout to make the categories appear on your blog. Go back to “Layout” and click on “Add a Gadget” in the space underneath the header. Note: If you want your navigation bar placed on your sidebar, click on “Add a Gadget” in the sidebar space.


Step 5: Choose “Pages” from the list of gadget options.


Step 6: Drag and drop your categories to rearrange them in the order you want them to appear and then click “Save.”


ADJUST THE POSITIONING OF THE LINKS


Read More