

Showing posts with label Gadget/Widget. Show all posts
Showing posts with label Gadget/Widget. Show all posts
Monday, May 17, 2021
Sunday, May 16, 2021
How to customize or edit the linkwithin related post widget
in: Blogging Tricks Gadget/Widget Related Posts WidgetLinkWithin is a very popular widget that shows the related posts with a thumbnail and although it is not a new gadget among bloggers, many avoid using it for its lack of customization. So, in this post we will see how to add LinkWithin on a Blogger blog and how to customize it.

This is what we will do with this gadget:
- Change the location of the gadget;
- Remove the LinkWithin link;
- Change the "You might also like" title with any other text;
- Add rounded borders to images;
- Remove the border that separates posts;
- Add a background color;
- Change the background color on mouse over;
- Change the post titles color and font
How To Add A Tabbed Navigation Widget to Blogger
in: Gadget/Widget Navigation Bar Page NavigationThe tabviews are elements that allow us to group in a single container various gadgets and these can be selected via tabs.
Its main function is to save space on the blog to avoid scattered gadgets in the same category so you can group multiple gadgets into one. There are several methods for creating tabviews, some require jQuery, other MooTools, or any other script.
Tuesday, May 11, 2021
How to Add Google Translate Widget with Flags For Blogger
in: Blog Designing Blogging Tricks Gadget/Widget Google Translate WidgetThe Google Translate Widget for Blogger allows the visitors to translate your site or blog in their own language.
This widget also auto-detect your blog language and then translate it to the readers chosen language.It supports 12 different languages:
English, French, German, Spanish, Italian, Dutch, Portuguese, Russian, Japanese, Korean, Arabic And Chinese.

Wednesday, May 5, 2021
How to create Awesome Slide Open Heart Bookmarking Gadget For Blogger
in: Blog Designing Blogging Tricks Floating Social Media Gadget/Widget Social MediaThe heart bookmarking gadget has a cool slide out effect that makes the heart icon split each time you mouse hover it, displaying several bookmarking buttons like Facebook, Twitter, Pinterest, LinkedIn, Stumble Upon, Email and many more bookmarking choices. This gadget/widget comes with a fixed position and stays in the corner of the page, so it will grab your readers attention and make them share your posts easily.
I'm sure you will love it after seeing the demo of this gadget:
Saturday, April 17, 2021
How to remove/Hide labels from blog posts
in: Blogging Tricks Gadget/Widget labels
Many bloggers might find labels below posts (or post titles) unnecessary, as long as they are already in the blog's sidebar. In this tutorial we will learn how to remove them manually. To hide labels from the blogger post footer (or below post title), we could simply uncheck the "Labels" option, however, sometimes this setting might not work properly in certain templates and then we'll have to remove it manually from our template.
How we are going to do this?
Sunday, December 18, 2016
How to Add Links in WordPress Text Widgets
in: Blogging Tricks Gadget/Widget Wordpress
Most of these widgets are automated and do not have many options. For example, the recent posts widget will automatically show links to your recent posts.
If you want to add some custom text with links in your sidebar, then you can use the Text Widget.
Text widget allows you to add text and basic HTML inside it.
There are two ways you can add a link into a text widget. First method requires you to write some very basic HTML.
Method 1: Adding a Link in HTML
Creating a link in HTML is very simple. Take a look at the following example.
<a href="http://www.wpbeginner.com">WPBeginner</a>
It will now show WPBeginner linked to wpbeginner.com.
The href tag is where you add the URL. Make sure to add http:// before the domain.
In between the anchor tags, you can add any text that you want to link, in our example WPBeginner.
Here is a screenshot of a text widget with an HTML link inside it.

Method 2: Using a Plugin
If you don’t want to write HTML, then you can enable visual editor for your text widgets.
You would need to install and activate the Black Studio TinyMCE Widgetplugin. If you need help installing a WordPress plugin, then follow our step by step guide to install a WordPress plugin.
Upon activation, simply go to Appearance » Widgets page. You will notice a new widget titled ‘Visual Editor’ under available widgets.
Drag and drop this widget to a sidebar where you want to add your custom text and links. The widget will expand to show a text area with the same Visual Editor as your WordPress posts and pages.

You can now add links and format your text just like you would do in the post editor.
Wednesday, October 5, 2016
How to make a gadget only appear on the first page or on a specific post or page
in: Blogger Blogging Tricks Gadget/Widget
Note: in Blogger, the words "gadget", "widget", and even "page-element" all mean the same thing. I generally use "gadget", because the Page Elements tab currently says "Add a Gadget". But they're absolutely the same.
1 Add the gadget
Do this in the usual way.
2 Place the gadget
Drag-and-drop the gadget to the place where you want it. It may be over or under your blog-posts gadget, or in a totally different place.How to allow changes above your blog's header
in: Blogging Tricks Gadget/Widget
Follow these steps to make it possible for you (or any blog administrator) to add gadgets to the area about your blog's heading section:

1 Edit your blog's template in the usual way
Tuesday, August 30, 2016
How To Add Random Posts Widget for Blogger Blog
in: Blogger Blogging Tricks Gadget/Widget Recent Post Display
Random post is a widget that displays the random articles list in blogger sidebar or anywhere you want to show it. As we know this widget isn’t available by default in blogger, we will need to add this through third party coding. By adding the random post widget on your blog, your blog articles automatically will appear randomly. This very close to recent posts widget and related posts widget. The aim of the adding random post widget in your blog is that it helps to engage your readers and increase the blog page view as well. Another advantage of the adding this widget is that it helps to make your blog more eye catching. Well, in this post I would like to share with you that how to create a random post in blogger blog. For those who are looking for a cool random post widget, I’m sure they’ll love to this widget.
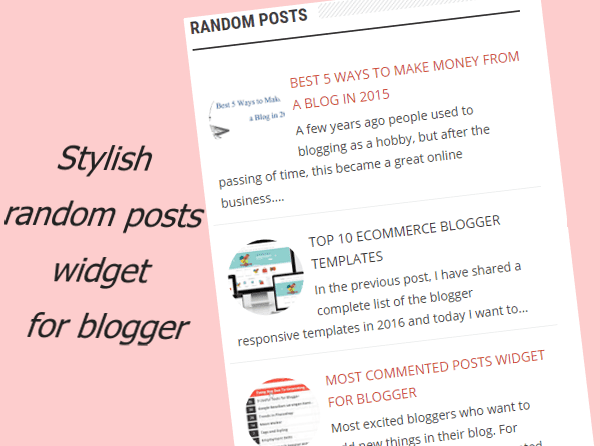
How to add random posts widget in blogger
To add this widget in your blog isn’t easy, you need to write JavaScript and CSS coding. Which isn’t possible for every blogger, but don’t worry! In this post, we are going to add this widget, through already written code. So, you don’t need to write JavaScript and CSS coding. Only follow the below simple steps to add this widget in your blog.
1. Click on below view button and copy all code from appearing window.
2. Login to your blogger and go layout section
3. Add a gadget and click on HTML/JavaScript and the copied paste.
4. save the widget.
5. Now view the blog, Wow! You have successfully added the random post widget in your blog.
3. Add a gadget and click on HTML/JavaScript and the copied paste.
4. save the widget.
5. Now view the blog, Wow! You have successfully added the random post widget in your blog.
How to customize the random post widget
If you want to adjust its look and function. You can do it by little modification in its coding.
- var rdp_numposts = 5; this the number of posts, how many you want to displa.
- var rdp_snippet_length = 120; To set the number of characters that will be displayed
- var rdp_info = ‘no‘; Replace with yes if you want to show the info post
- var rdp_comment=’comment’ display the post comments.
Now your done!
Friday, August 19, 2016
How to Add an Alexa Ranking Widget in website or Blog
in: Blogger Blogger Widget Blogging Tricks Gadget/Widget
Alexa Ranking is only one factor now, That decides the how popular your blog or website is.
So why is Alexa rank important? Alexa is a competitive intelligence tool that is used to measure and compare your website with competitors and shows the global traffic rank for a website. The ranking number helps advertisers to analyze the marketing capacity of your website. If you have a good ranking in Alexa then these advertisers will be ready to buy an ad space on your website for a really high price.

Alexa Site Ranking Button

Now you have to replace askmebyte.com with your website name and its done!!!!
So why is Alexa rank important? Alexa is a competitive intelligence tool that is used to measure and compare your website with competitors and shows the global traffic rank for a website. The ranking number helps advertisers to analyze the marketing capacity of your website. If you have a good ranking in Alexa then these advertisers will be ready to buy an ad space on your website for a really high price.
 |
| Alexa Ranking Widget |
To Increase Alexa Raking of your websites there are Different Ways, One of those way is to embed the alexa Ranking button to the blog and websites.
1. How to Add an Alexa Ranking to the Blog or Websites?
Here I have listed HTML code which you need to add to your websites or blog. There are three different sizes.
Alexa Site Status Button
It shows your website rank with total number of links.
120 X 95
<a href="http://www.alexa.com/siteinfo/askmebyte.com"><script type="text/javascript" src="http://xslt.alexa.com/site_stats/js/s/a?url=askmebyte.com"></script></a>120 X 240
<a href="http://www.alexa.com/siteinfo/askmebyte.com"><script type="text/javascript" src="http://xslt.alexa.com/site_stats/js/s/b?url=askmebyte.com"></script></a>468 X 60
<a href="http://www.alexa.com/siteinfo/askmebyte.com"><script type="text/javascript" src="http://xslt.alexa.com/site_stats/js/s/c?url=askmebyte.com"></script></a>
Alexa Site Ranking Button
It shows your website rank.
120 X 65
<a href="http://www.alexa.com/siteinfo/askmebyte.com"><script type="text/javascript" src="http://xslt.alexa.com/site_stats/js/t/a?url=askmebyte.com"></script></a>120 X 90
<a href="http://www.alexa.com/siteinfo/askmebyte.com"><script type="text/javascript" src="http://xslt.alexa.com/site_stats/js/t/b?url=askmebyte.com"></script></a>468 X 60
<a href="http://www.alexa.com/siteinfo/askmebyte.com"><script type="text/javascript" src="http://xslt.alexa.com/site_stats/js/t/c?url=askmebyte.com"></script></a>
Now you have to replace askmebyte.com with your website name and its done!!!!
How to add Recent post widget/gadget in blogger blog.
in: Blogger Blogger Widget Blogging Tricks Gadget/WidgetHow to add Recent post widget/gadget in blogger blog.
- Log into Blogger.com
- Go to Blogger Dashboard.
- Click on Layout
- Than Click on Add a Gadget.
 |
| 5 Type of Recent Post Widget Blogger Widgets/Gadgets |
- Now choose html/Javascript .
- Now copy paste your desired code from below.
 |
| 5 Type of Recent Post Widget Blogger Widgets/Gadgets |
Scrolling/Ticker Recent Post Widget
It is a scrolling recent post widget for blogger blog.this recent post widget with thumbnails will show images on the right hand side and post titles in the left side with details or snippets.there are lots of options for customization if you want.i think it is the best animated recent post widget with thumbnails.
 |
| 5 Type of Recent Post Widget Blogger Widgets/Gadgets |
<style>img.recent_thumb {padding:1px;width:55px;height:55px;border:0;float:right;margin:0 0 5px 10px;}.recent_posts_with_thumbs {float: left;width: 100%;min-height: 70px;margin: 5px 0px 5px 0px;padding: 0;font-size:12px;}ul.recent_posts_with_thumbs li {padding-bottom:5px;padding-top:5px;min-height:65px;}.recent_posts_with_thumbs a {text-decoration:none;}.recent_posts_with_thumbs strong {font-size:10px;}</style> <script style='text/javascript' src="https://dl.dropbox.com/s/ercbfzxm41o63i4/NBTjQuery-scrolling-ticker.js" ></script> <script style='text/javascript' src='https://dl.dropbox.com/s/mzcmuhcas156xhx/NBTscrollingRP.js'></script> <script style='text/javascript'> var numposts = 10; var showpostthumbnails = true; var displaymore = false; var displayseparator = false; var showcommentnum = false; var showpostdate = false; var showpostsummary = true; var numchars = 100; $(document).ready(function () {$('#sai').vTicker({ speed: 500, pause: 3000, showItems: 3, animation: 'fade', mousePause: false, height: 0, direction: 'up' });}); </script> <div id="sai"> <script src='http://www.rohanmod.blogspot.com/feeds/posts/default?orderby=published&alt=json-in-script&callback=showrecentpostswiththumbs'></script> </div>
Stylish Animated Recent Post Widget
 |
| 5 Type of Recent Post Widget Blogger Widgets/Gadgets |
<script src="http://ajax.googleapis.com/ajax/libs/jquery/1.3.2/jquery.min.js" type="text/javascript"></script>
<style type="text/css" media="screen">
<!--
#spylist {
overflow:hidden;
margin-top:5px;
padding:0px 0px;
height:350px;
}
.spydate{
overflow:hidden;
font-size:10px; }
#spylist ul{
width:350px;
overflow:hidden;
list-style-type: none;
padding: 0px 0px;
margin:0px 0px;
}
#spylist li {
width:230px;
background: #1ed2f2;
list-style-type: none;
margin:0 0 5px 0px;
padding:5px 5px 1px 10px !important;
-webkit-transition:all 0.2s ease;-moz-transition:all 0.2s ease;-o-transition:all 0.2s ease;border: 0 none !important;-webkit-border-top-left-radius:40px;-webkit-border-bottom-right-radius:40px;-moz-border-radius-topleft:40px;-moz-border-radius-bottomright:40px;border-top-left-radius:40px;border-bottom-right-radius:40px;
}
#spylist li:hover {
background: #84f6f5;
}
#spylist li a {
text-decoration:none;
color:#4B545B;
font-size:11px;
height:18px;
overflow:hidden;
margin:0px 0px;
padding:0px 0px 2px 0px;
}
#spylist li img {
float:left;
margin-right:5px;
margin-top:3px;
background:none;
border:0;
}
.spycomment{
overflow:hidden;
font-family:Tahoma,Arial,verdana, sans-serif;
font-size:10px;
color:#262B2F;
padding:0px 0px;
margin:0px 0px;
}
-->
</style>
<script language='JavaScript'>
imgr = new Array();
imgr[0] = "http://i43.tinypic.com/orpg0m.jpg";
imgr[1] = "http://i43.tinypic.com/orpg0m.jpg";
imgr[2] = "http://i43.tinypic.com/orpg0m.jpg";
imgr[3] = "http://i43.tinypic.com/orpg0m.jpg";
imgr[4] = "http://i43.tinypic.com/orpg0m.jpg";
showRandomImg = true;
boxwidth = 255;
cellspacing = 6;
borderColor = "#232c35";
bgTD = "#000000";
thumbwidth = 70;
thumbheight = 70;
fntsize = 12;
acolor = "#666";
aBold = true;
icon = " ";
text = "comments";
showPostDate = false;
summaryPost = 40;
summaryFontsize = 10;
summaryColor = "#666";
icon2 = " ";
numposts = 5;
home_page = "http://rohanmod.blogspot.com/";
limitspy=4
intervalspy=4000
</script>
<div id="spylist">
<script src='http://dl.getdropbox.com/u/708209/scriptabufarhan/recentspy/recentpostthumbspy-min.js' type='text/javascript'></script>
</div><a style=" float:right;font-size:8px; color:#3B78CD; text-decoration:none;" href="http://rohanmod.blogspot.in/2013/03/5-type-of-recent-post-widget-blogger.html">Blogger widget</a>
Recent Post Widget With snippets and without snippets
This recent post widgets has two variations first blogger widget recent post widget is with snippets or details of post and second recent post widget is with post titles only.both are very fast in loading.best simple recent post widget in category of blogger widget.
 |
| 5 Type of Recent Post Widget Blogger Widgets/Gadgets |
<div id="hlrpsa">
<script src="http://helplogger.googlecode.com/svn/trunk/recent-posts-with-snippets.js">
</script>
<script>
var numposts = 5;var showpostdate = false;var showpostsummary = true;var numchars = 100;var standardstyling = true;
</script>
<script src="YOUR-BLOG/SITE-URL/feeds/posts/default?orderby=published&alt=json-in-script&callback=showrecentposts">
</script></div>
<div id="rpdr" style="font-family: arial, sans-serif; font-size: 9px;">
<a href="http://rohanmod.blogspot.in/2013/03/5-type-of-recent-post-widget-blogger.html" target="_blank" title="Rohanmod">Recent Posts Widget</a> by <a href="http://rohanmod.blogspot.com" title="Recent Posts Widget">rohanmod</a></div>
<noscript>Your browser does not support JavaScript!</noscript>
<style type="text/css">
#hlrpsa a {color: #0B3861; font-size: 13px;} #rpdr {background: url(https://blogger.googleusercontent.com/img/b/R29vZ2xl/AVvXsEg9h6i47lpfVI5qdQjrEp5U8OVYGMnPZ8IkUAGozNj99ZPgs7Khi9ed8X3TXu23jVOghayLrSpjSfYeRx_euIxaZu3q_NXOIx6-R3RmjkuaBgUqNUJvxmYBf2T4grCVHua6zoEbj-h1KYe6/s1600/blogger.png) 0px 0px no-repeat; padding: 1px 0px 0px 19px; height:14px; margin: 5px 0px 0px 0px;line-height:14px;}
#rpdr, #rpdr a {color:#808080;}
#hlrpsa { color: #999999; font-size: 11px; border-bottom:1px #cccccc dotted; margin-top:-10px; padding-bottom:10px;}
.hlrps a {font-weight:bold; }
.hlrpssumm {}
</style>
Recent Post widget without snippets
<div id="hlrpsb">
<script style="text/javascript" src="http://helplogger.googlecode.com/svn/trunk/recent-posts-with-titles-only.js"></script>
<script style="text/javascript">var numposts = 10;var showpostdate = false;var showpostsummary = false;var numchars = 100;var standardstyling = true;</script>
<script src="http://your-blog.blogspot.com/feeds/posts/default?orderby=published&alt=json-in-script&callback=showrecentposts"></script></div>
<div style="font-family: arial, sans-serif; font-size: 9px;" id="rpdr"><a href="http://rohanmod.blogspot.in/2013/03/5-type-of-recent-post-widget-blogger.html" title="Grab this" target="_blank">Recent Posts Widget</a> by <a href="http://rohanmod.blogspot.com" title="Recent Posts Widget">rohanmod</a></div><noscript>Oops! Make sure JavaScript is enabled in your browser.</noscript>
<style type=text/css>
#hlrpsb a {color: #0B3861; font-size: 13px;} #rpdr {background: url( https://blogger.googleusercontent.com/img/b/R29vZ2xl/AVvXsEg9h6i47lpfVI5qdQjrEp5U8OVYGMnPZ8IkUAGozNj99ZPgs7Khi9ed8X3TXu23jVOghayLrSpjSfYeRx_euIxaZu3q_NXOIx6-R3RmjkuaBgUqNUJvxmYBf2T4grCVHua6zoEbj-h1KYe6/s1600/blogger.png ) 0px 0px no-repeat; padding: 1px 0px 0px 19px; height:14px; margin: 5px 0px 0px 0px;line-height:14px;}
#rpdr, #rpdr a {color:#808080;}
.bbrecpost2 {
padding-top:6px;
padding-bottom:6px;
border-bottom: 1px #cccccc dotted; }
</style>
Recent Post Widget with thumbnails.
 |
| 5 Type of Recent Post Widget Blogger Widgets/Gadgets |
<div class="eggTray">
<script src="http://helplogger.googlecode.com/svn/trunk/listbadge.js">{"pipe_id":"1a6640e2a78b2c6e736f2220529daae5","_btype":"list",
"pipe_params":{"URL":"YOUR-BLOG/SITE-URL/feeds/posts/default"},
"hideHeader":"false","height":"500","count": 8 }</script>
<div style="font-family: arial, sans-serif; font-size: 9px;" class="ycdr"><a href="http://rohanmod.blogspot.in/2013/03/5-type-of-recent-post-widget-blogger.html" target="_blank" title="Grab this widget">Recent Posts Thumbnails</a> <a href="http://rohanmod.blogspot.com/" target="_blank">Blogger Widget</a></div><noscript>Your browser does not support JavaScript!</noscript></div>
<style type=text/css>
.eggTray {margin:10px 0px;padding:0px;}
.ybr li {border-bottom:0px #cccccc dotted; padding:0px 0px 10px 0px!important;}
.pipesTitle {padding-top:0px;}
.pipesDescription {display:true;}
.ycdr {background:transparent url(https://blogger.googleusercontent.com/img/b/R29vZ2xl/AVvXsEgoVuwHZp2nYVP86xxniFNxCdGZsurKZwgaL5p9xVlmQztXQuC9zm4E29_eVk9yYiFFLogYg3VShyphenhyphenMhdVZm72Q6nvpuQIHNDTG3l-epUI3yEramHzHI_Qq00Co4XjZlJDvzlGsdQZuT2KE/s1600/logo.png) 0px 0px no-repeat; padding: 1px 0px 0px 19px; height:14px; margin: 4px 0px 0px 0px;line-height:14px;}
.ycdr, .ycdr a {color:#999999;}
.widget .popular-posts ul {padding-left:0;}
</style>
Blogger widget customization
Insert your blog url where YOUR-BLOG/SITE-URL is present.How To Add Contact Form (Contact Us Page) in Blogger
in: Blogger Blogging Tricks Contact Form Gadget/WidgetAdding a contact us form in Blogger is a tedious task as it does not support plugins like WordPress.
The Benefits of Official Blogger Form
- You will get the message as soon as one sends it. And, the deliverability is 100% as well.
- The simple interface makes it easy for the visitors to contact you.
- If you know Cascade Style Sheet (CSS) language, it will be easy for you to customize the form as per your liking.
- The entire page will not get reloaded for sending the message.
I have divided this tutorial into three sections, adding the contact gadget, hiding it and implementing the official code in a new page.
Part – 1: Adding the Contact Gadget
Follow the steps given below to add a contact us gadget on your blog.
Step 1: Visit blogger.com and log in to your account. If you are running multiple blogs, you need to choose the desired blog from the list.
Step 2: Click on Layout from the left sidebar to get an option to add gadgets.

Step 3: You can see an Add a Gadget link on the main panel on the right side. Clicking on it will bring you to a list of gadgets.

Step 4: Then, choose More gadgets from the left side. Now, you will see Contact Form. Just add the same.

Part – 2: Hiding the Gadget
Now, you are going to learn how to hide the contact gadget.
Step 1: We need to play with the template section here. So, click on Templates from the left menu.

Step 2: Then, click on Edit HTML and you will be provided with the whole code of your blog in a large field.

Step 3: Search for ]]></b:skin> and place the following code just before it.
div#ContactForm1 {
display: none !important;
}
display: none !important;
}

Then, click Save to retain the changes.
After the third step, you will not see Contact widget on your blog.
Part – 3: Adding Contact Form to a Page
You will get the customized official blogger contact form code here to be added to be shown on a separate page.
Step 1: Go to Pages and click on New page.

Step 2: Paste the following code into the HTML post editor after removing everything in it.

Step 3: Add a title (like Contact Us) and then change the settings given right as given below.

Step 4: Finally, click the Publish button. That’s all.